Home learning Week 12
Happy Monday everyone! Hope you are all well and ready for this week’s work – the final week before the summer holidays!!
English (Story writing)
Read through the following short story. Add WOW words and phrases of your own as shown ————. Try to include examples of alliteration, personification and similes.
The Umbrella
It was a —— night; the darkness covered the city like a ———–. The wind blew gusts of air smelling of car fumes through the streets; it —— under the cracks of doors and ———- down sooty chimneys.
Mr Bell hurried down a dark street, ——– onto his bowler hat so that the harsh breeze couldn’t steal it. The wind blew ——, almost blowing the short, stout man off-course. Eyes narrowed, Mr Bell tried again to walk into the path of the determined gale. A hazy drizzle of misty rain ———, making him shiver and cough. Cursing the cold, he ——-his coat tighter around his large figure. As he made to clamp his hat to his head again, he ——– something black and flapping on the pavement. An umbrella!
His heart leapt; the umbrella would be perfect! Feeling pleased with himself, Mr Bell ——- towards it and snatched it up. The handle was ——- and ——, and the waterproof dome was black and ————.
As Mr Bell raised it above his head, something remarkable happened. He began to feel lighter as he ——- over the cobbled street, holding tight. Lighter and lighter. With a gasp, he realised that ————————. The wind lifted him up like hundreds of hands, all pushing upwards.
With a delighted and shocked shout, Mr Bell gazed down at the ————- city below him. The street lamps looked like ——–, ——– flowers reaching up to him. Cars reminded him of ———– beetles crawling through the concrete maze.
The wind ——- him towards the park; it was the only splash of green in a grey ocean of buildings and roads. Clutching the umbrella ——-, he drifted towards two ——- statues of lions guarding the park entrance. Mr Bell outstretched his free hand and reached towards one. As he passed, he ——- it on its cold head. The —- roared deeply and shook its ——— mane, whilst watching the small man —— past. Wide-eyed, Mr Bell swung himself away. The umbrella ——– dangerously and as he ——— the handle harder, he waited dizzily for the world to stop ———.
Now, continue the story to say what happened next. Think about other things Mr Bell might see on his journey before arriving home. The story ends in the following way
As he stood outside his front door, he folded the umbrella up and smiled as he thought about what an exciting bedtime story his children would have that night.
Science/DT –
Simple Sled Kite (*There is a moviemaker clip available for this kite on You Tube.)
The Sled Kite is relatively unknown outside of the world of ardent kite flyers. People who fly kites all the time know the Sled Kite as a very simple kite to build. It is very forgiving of mistakes in construction and is a wonderfully easy kite to fly.
Why would anyone call a kite a ‘Sled’? Well, when the kite was invented by William Allison of Dayton, Ohio in 1950, he patented it as a ‘polymorphic’ kite, meaning it could take on many different shapes according to the wind. Frank Scott modified Allison’s design and wanted to call it a ‘Flexible Flyer’. But that name was already being used by a company making the Flexible Flyer Snow Sleds. So Scott called his kite a ‘Sled Kite’. They have been called Sled Kites ever since. There are almost as many different types of Sled Kites as there are people who have made them.
The Sled Kite can be made from almost anything: bin bags, carrier bags, newspaper, even wrapping paper-anything relatively light and strong. The kite is also easily ‘scalable’. It can be made quite large, or quite small.
Materials List:
Spar making material (bamboo skewers or plastic straws)
Sellotape
Scissors
Hole punch
Ruler
Template paper
Kite material: plastic bags, or newspaper
String
Step 1: Decide the size of the kite
Decide what height you would like to have your kite. This sample kite uses spars made from bamboo skewers. Plastic/paper straws will also work just as well.
Step 2: Preparing a template – use either of the following, based on the size of a sheet of A4 paper
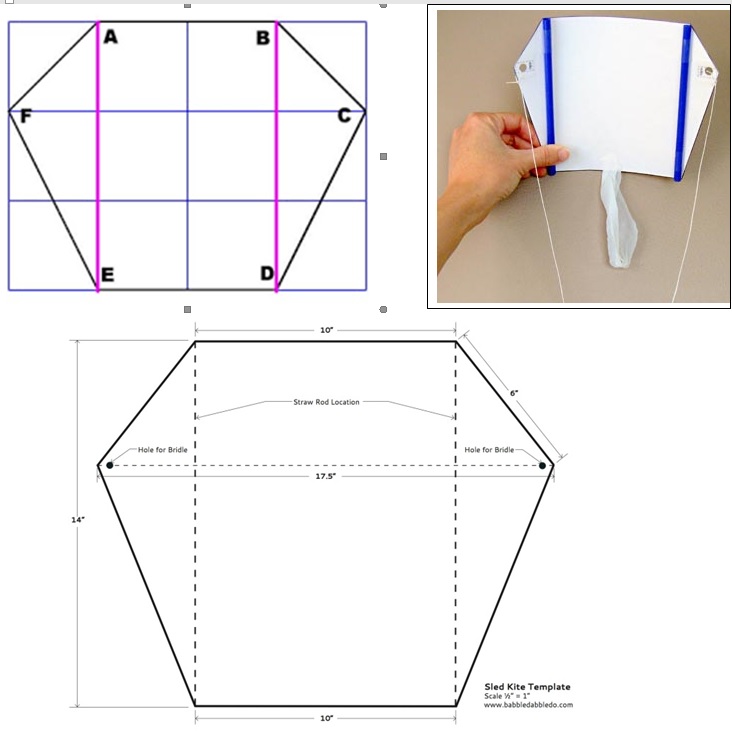
Step 3: Now cut out the template.
Step 4: Use the template to cut out the kite.
Take the kite material. Make sure the piece is twice the size of your template. Fold the kite material in half. Place the long side of the template on the fold. This can be lightly taped in place. Cut around the outsides of the template. Do NOT cut the fold apart!
Step 5: Open up the sail.
Tape the spars (in this case, skewers) from point to point.
Step 6: Holes for the string.
Reinforce each of the points of the kite. On each of the two points of the wings, punch a hole.
Step 7: The tails.
Make 30 inch tails from plastic strips and tape at the bottom ends of each of the spars. The tails may be in bunches and be made from the left-over plastic.
Step 8: Adding the bridle.
Take a piece of kite string that is 36 inches long. This will be the bridle. Put the ends through the holes on the wings and tie tightly.
Step 9: Balancing the kite and bridle.
Now, hold the kite by the string and let dangle. Match the kite halves. Next make a loop in the bridle. Double-knot it so that it doesn’t slip.
Step 10: Finishing
Fasten your kite string to the loop and GO FLY your kite.
Remember to fly your kite in a wide open space – not near any overhead wires.
Maths
This week we have a ‘mixed bag’ of maths activities – time themed reasoning, number sequences, line graphs and converting measures.
Reasoning
How Many Times?
On a digital 24 hour clock, at certain times, all the digits are consecutive (in counting order). You can count forwards or backwards. For example, 1:23 or 5:43.
How many times like this are there between midnight and 07:00?
How many are there between 07:00 and midday?
How many are there between midday and midnight?
Sequences
Explain what is happening in each sequence, writing a rule for moving from one term to the next if you can. Write the sequence with the missing numbers.
Example
- 4 5 7 11 ? ? ?
- The rule is x2 , -3
4 5 7 11 19 35 67
Questions
A. 2 7 14 19 38 ? ? ?
B. 87 79 72 66 61 ? ? ?
C. 1 4 9 16 25 36 ? ? ? ?
D. 176 88 44 ? ? ?
E. 2 5 10 13 26 29 ? ? ? ?
*Finding the difference between consecutive numbers
* find half/double the number
Line Graph
Look at this ‘Overnight temperature’ graph for a desert area. It shows the outside temperatures in ºC.
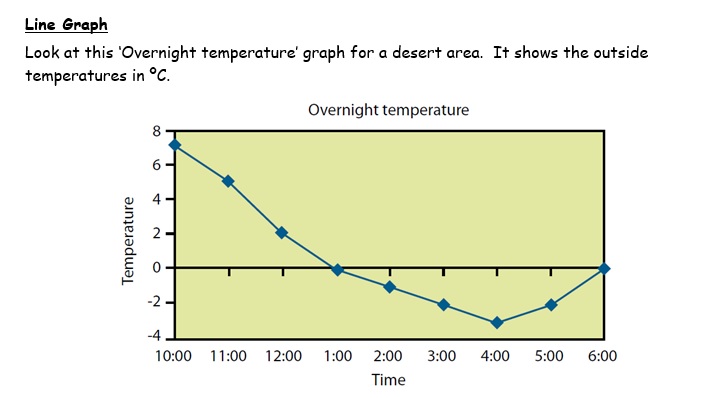
Answer these questions:
What was the highest temperature? When did it occur?
What was the lowest temperature? When did it occur?
When was the temperature at freezing point (0 ºC)
How far did the temperature fall from 11:00 pm to 3:00 am?
How long did the temperature stay below zero?
How long did the temperature stay above zero?
Roughly what temperature was it at 11:30 pm?

Imperial
- 15miles=____km
- 33lbs =____kg
- 5L=____pints
- 525g=____ounces
- Bert makes a journey to visit his mum. He travels 66 miles. How far is this in km?
- The school coach travelled 176km – what was the distance in miles?
- 75cm=____inches
- 75cm=____feet
- 5kg=____lbs
- 48km=____miles
- Joshua buys 14 litres of lemonade for a party. How many pint glasses will this fill?
Weekly Do’s/Important websites
HWB – https://hwb.gov.wales/
These are the two online primary websites which are used by Godre’rgraig class teachers and children. These are the most effective for your child’s learning and will be linked to their age and ability. Your children will be familiar with these and the majority will be able to use independently after the initial set-up.
Children will need passwords and username details which were sent previously via Schoop.